FAQ
A wall of tires in a bike shop can be intimidating to sort through when it's time for a new tire. They all look similar. How do you choose? Why do the different widths matter? Front or Rear tread?
Let us help make your choices easier. Here's our in-depth guide on what goes into an e*thirteen tire.

Before shopping:
Note what wheel you have. Is it a 29er, a 27.5”, 26” or something else? If you know your rim’s inner width, this can help you pick the best width tire for optimal profile. If you’re not sure, fear not. It’s not 100% necessary.
- A 27mm internal width rim provides the best profile for tires up to 2.4” wide.
- A 30mm internal width rim provides the best profile for tires 2.3-2.6” wide.
- A 35mm internal width rim provides the best profile for tires 2.4-2.8” wide.
The next thing to sort out is what level of flat protection you’d like (determined by the casing) and how much stickiness you want to the grip (determined by the rubber compound). Generally, the more flat protection, the more layers the tire has and the heavier it will be. Weight is definitely important but is only one factor to look at. The added protection that you get from these features can be worth the extra grams for peace of mind bombing down the hill.
We currently offer four tire models in a variety of casings and compounds to meet your needs. All of our tires work whether front or rear, no specifics here for that. We like to keep things simple.
Compounds
Our three compound configurations are MoPo, Control and Endurance.
- Choose Mopo Compound for the ultimate soft, tacky grip.
- Choose Endurance for fast and durable.
- Choose Control for a perfect “in between” from Mopo or Endurance: fast and durable but with more tack.
Pro tip: While our tread patterns can be run either front or rear, you may want to run different compounds to give you different traction. A good rule of thumb is to have a stickier tire in the front and a faster rolling tire in the rear. It can also be helpful to run a tire with slightly more traction in the front for maximum grip. A popular combo for here in California is a Grappler MoPo in the front and an All Terrain Control or Endurance in the rear. If you're doing more trail riding than Enduro so you don't need quite as much grip as a Grappler, you may want an All Terrain MoPo in the front and Control or Endurance rear. If you like a little more maneuverability, run an All Terrain up front and an Optimus in the rear.

Casings
Our casing configurations are a bit more complicated, but for good reason. Rather than being specific to the tire model, the casing options are determined by the use case. Here you’ll find features like sidewall protection, tubeless inserts for extra support, and whether a casing is single ply or dual ply. We use strong Aramid fibers in our sidewall protection to stand up as much as possible to flats.

So now that you understand the casing and compound options a bit better, how do you determine which model tire you’d like? Let’s break down each model to help clarify.
Grappler 2.5" Tire - Ultimate Grip in Aggressive Terrain
Casings: Enduro, Downhill
Designed to tame the most technical trails, the Grappler’s generously spacer center tread digs into the chunder as well as distributes knob pressure evenly across the tire patch for ultimate grip even on the steepest slabs. The intermediate knob generates a smooth transition into the hard biting side knobs. Accordion sipes allow for the side knobs to find their home in uneven, rough terrain.
- Tread designed to give the most bite and control in loose, loamy or wet conditions
- Knob designs engineered to reduce fold-over for positive cornering at aggressive lean angles
- MoPo, our softest and slowest rebound compound, let's riders attack wet roots and slick rock with confidence and control
- Casing options allow riders more sidewall protection or lighter weights depending upon preference

Optimus 2.4” Tire - Supple, Fast Rolling, and Efficient
Casings: XC, Trail
Optimized for long days in the saddle, the Optimus’ fast rolling center tread and supple casing is all about efficiency and comfort. When the terrain gets a little rowdy, the hard biting intermediate and side knobs keep things under control in the corners and off camber.
- Faster rolling tires for efficiency and speed on the climbs
- High volume 2.4" casing and unique tread let's the rider push descents with the control of a trail tire
- Special Endurance compound offers 30% more tread life

All Terrain 2.4" Tire - The King of Versatility
Casings: Trail, Enduro, Downhill
All Terrain basically says it all - This is a do all tire that will shame most competing tires in their more focused conditions. Efficiency was the goal with this tread along with extreme turn angle and braking traction. If you’re looking for a trail tire that can do from the hardpack trails of SoCal to the mossy loam up in B.C. and hold it’s own, the AT is ready to satisfy.
- Tread designed to excel in every condition - delivers confident control no matter the conditions
- Compound and Casing options to support you with the best configuration for your needs

Zeppelin 27.5" 2.7” Tire - eMTB Rear Grip and Support
Casing: Emtb
Engineered for mullet ebikes, the Zeppelin tread and casing provide grip and support at lower inflation pressure. The knob spacing allows for even pressure and better wear, making it the perfect blend of performance and longevity required for modern ebikes.
- Aggressive tread design for the added weights and power of eMTB trail riders
- More supportive e*spec 2.7" casing helps take hits and transfer ebike toque to the ground for more efficient climbs
- Endurance compound extends tire life by 30% without compromising control
- Casing options allow riders more sidewall protection or lighter weights depending upon preferences

We hope this clears things up a bit. If you're still unsure what to run, reach out to us at support@ethirteen.com with your riding style and conditions. We're happy to help!
Ready to Shop? CLICK HERE
Curious how tires are made? Check out this video: https://freehub.com/videos/made-love-e13
- (Jump to the video below if you prefer) First and most importantly, make sure you are following best practice tire install procedure: Get one bead fully seated and sitting in the deepest part of the rim well before moving onto the next bead. With the next bead, you want to start from the end opposite to the valve and work your way around towards the valve. Along the way, ensure that the tire beads are sitting in the deepest part of the rim well - this is really important as it creates a looser fit for the bead sections not yet seated. The last section to seat should be right at the valve. Because the valve head prevents the bead from sitting deep in the rim well, finishing the seating process at the valve is important for tough fitting tires.
- Enduro/DH casing tires, will likely require the use of tire levers to get the final section of tire bead over the rim. It's important to use a robust lever and also to avoid a greater than 45 deg angle of the tire lever to prevent damage to rim tape.
- Radial casing tires can be a bit trickier to install because the ply bias tends to want to keep the tire beads open and spread appart.
Tips and Tricks
- Pick a good work surface for the install. A big round garbage can at about waist height is a great surface to install the tire on.
- Using some bead lube or window cleaner on the tire beads can make pushing them over the bead hook much easier.
- Putting the tire in the sun or a warm car for a bit in advance of install will help soften the casing up and make the tire less stiff which makes the install process easier.
Sources of Potential Problems
- Rim Tape: Rim tape and number of wraps can play a big role in tire fit due to the fact that it builds up the OD of the rim well. Tapes such as Gorilla Tape can be very thick and make the install process much more difficult. e*thirteen tape is very thin and we recommend 2 full wraps around the rim. We spec a double layer of adhesive which easily compresses aiding tire install. Make sure you are using tubeless specific tape with the correct number of wraps specified by the manufacture and that it is fully seated in the rim well with no creases or crumples.
- Rims and Rim Design: Controlling tire bead sizing is much easier than controlling rim sizing. Oversized rims, rims that use non-ETRTO dimensions, or rims that use thick plastic tubeless strips can all make installing tires more difficult.
How to Correctly Install a Tire:
A number of factors can impact how well your tubeless setup seals and retains air. It is normal for even the heaviest duty tires with large amounts of sealant to lose small amounts of air over the course of a 24 hour period. Lighter weight tires with thinner casings will lose air faster.
Critical Factors
The majority of issues we see with tubeless sealing come from the following:
- Rim tape - Tape must be fully seated in rim well with no creases or damage which would permit air to escape into the rim itself. There should be no tears or seams. It's not uncommon for tape to be damaged or pushed aside when installing a tight fitting tire. Care needs to be taken to ensure tape is not damaged during tire install.
- Valve stems - Valves should be properly seated and tightened per the manufacturer specification
- Sealant issues: Old, inadequate volume or inadequately mixed/agitated sealant can all play a role in tubeless issues.
Troubleshooting your tubeless setup
The first goal with troubleshooting your tubeless setup is to identify exactly where air is escaping from. This will help identify potential causes to you will need to address. Here is an easy way to do this:
Start with a spray bottle with soapy water (a small amount of dish soap works great!). Remove the problem wheel from the bike and liberally spray the soapy water on the tire sidewall and rim area. Locations where air is escaping will quickly bubble up.
- Air escaping from the tire sidewall and/or the tire bead/rim interface:
- This could indicate and issue with the sealant, tire or tire/rim interface:
- Sealant: Ensure the sealant you used was properly agitated and the volume was correct.
- Rim: Ensure there are no dents or damage to your rim bead hook which might limit the tire bead/rim contact. This could jeopardize your ability to set the tubeless system up.
- Tire: It is totally normal for a new tire to have pores that need to be sealed by the sealant. This can take time, especially with lighter weight tires.
- #Protip Solution: Inflate your tire to the tire manufactures maximum recommended pressure (this is printed on the tire sidewall) and ride the bike for 10 min or spin the tire on the bike or in a stand for 10 minutes continuously to ensure the sealant is fully coating the inner surface. Reduce pressure back to normal running pressures. Increasing the pressure will open up the tire pores and get sealant into all those little micro-pores where the air is escaping. When you reduce the pressure, those micro-pores contract and let the sealant do it's job.
- This could indicate and issue with the sealant, tire or tire/rim interface:
- Air Escaping from the valve/rim interface, around spoke nipples or from the rim seam:
- This indicates that air is getting into the chamber of the rim and forcing it's way out via the path of least resistance - which typically is the rim/nipple interface or the valve/rim interface.
- Rim tape: The vast majority of cases where this occurs is due to the rim tape seal on the rim bed being compromised. Most often, this happens when the tire is being installed.
- Valve/rim bed interface: This also could be where the issue is coming from. Ensure your valve is properly tightened (over tight can be just as problematic as under tight) and that if your valve uses a directional grommet, that it is correctly orientated with the rim bed.
- Solution: Either of these cases will require removing the tire to address the problem. If the rim tape is damaged or not adhering properly, it's time to remove it, clean the rim bed, retape and then be extra cautious when reinstalling the tire.
- This indicates that air is getting into the chamber of the rim and forcing it's way out via the path of least resistance - which typically is the rim/nipple interface or the valve/rim interface.
Other important info:
- Over the first days and weeks that the new tire is installed, it is possible that you will lose a bit of air overnight. This will improve as the wheel is ridden and the sealant creates a thicker coating.
- Remember, no matter how well your sealant is working, it is important to check your tire pressure before every ride with a digital pressure gauge.
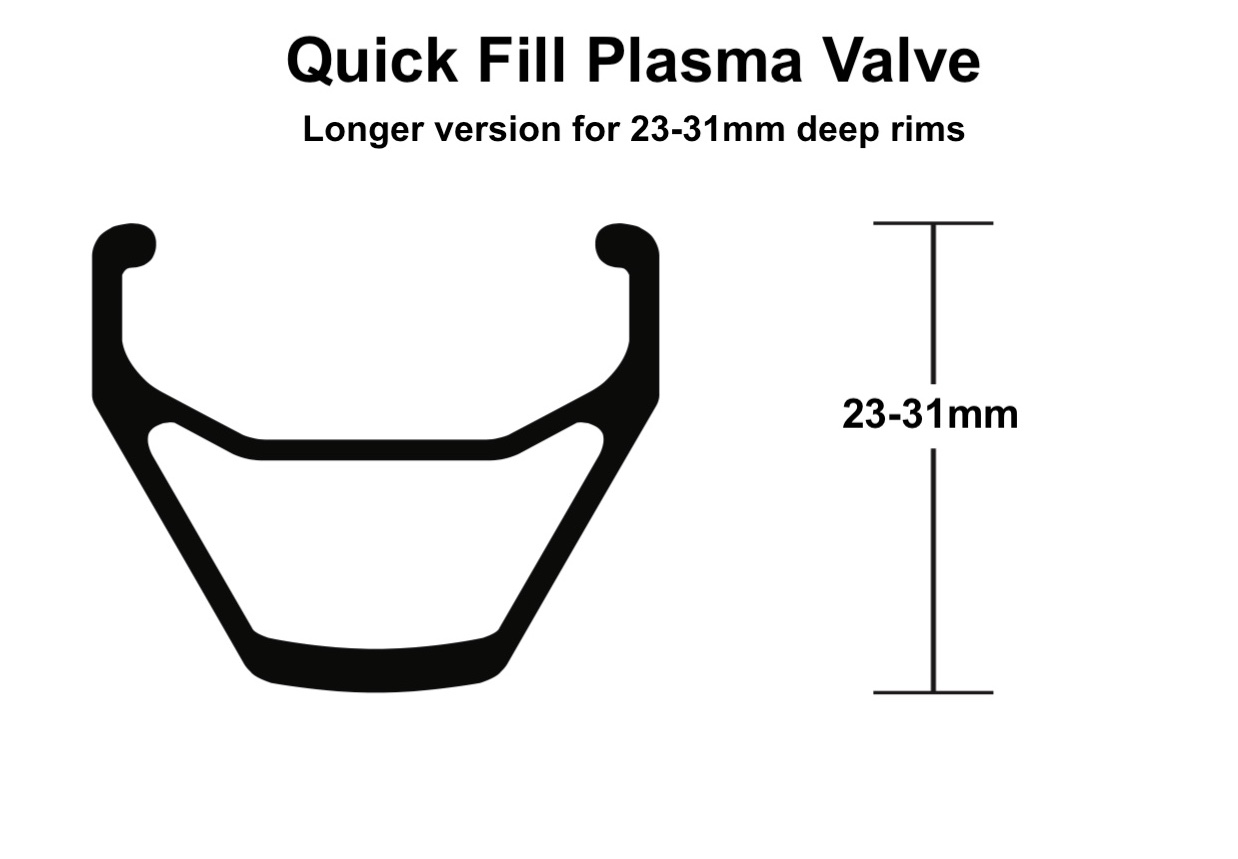
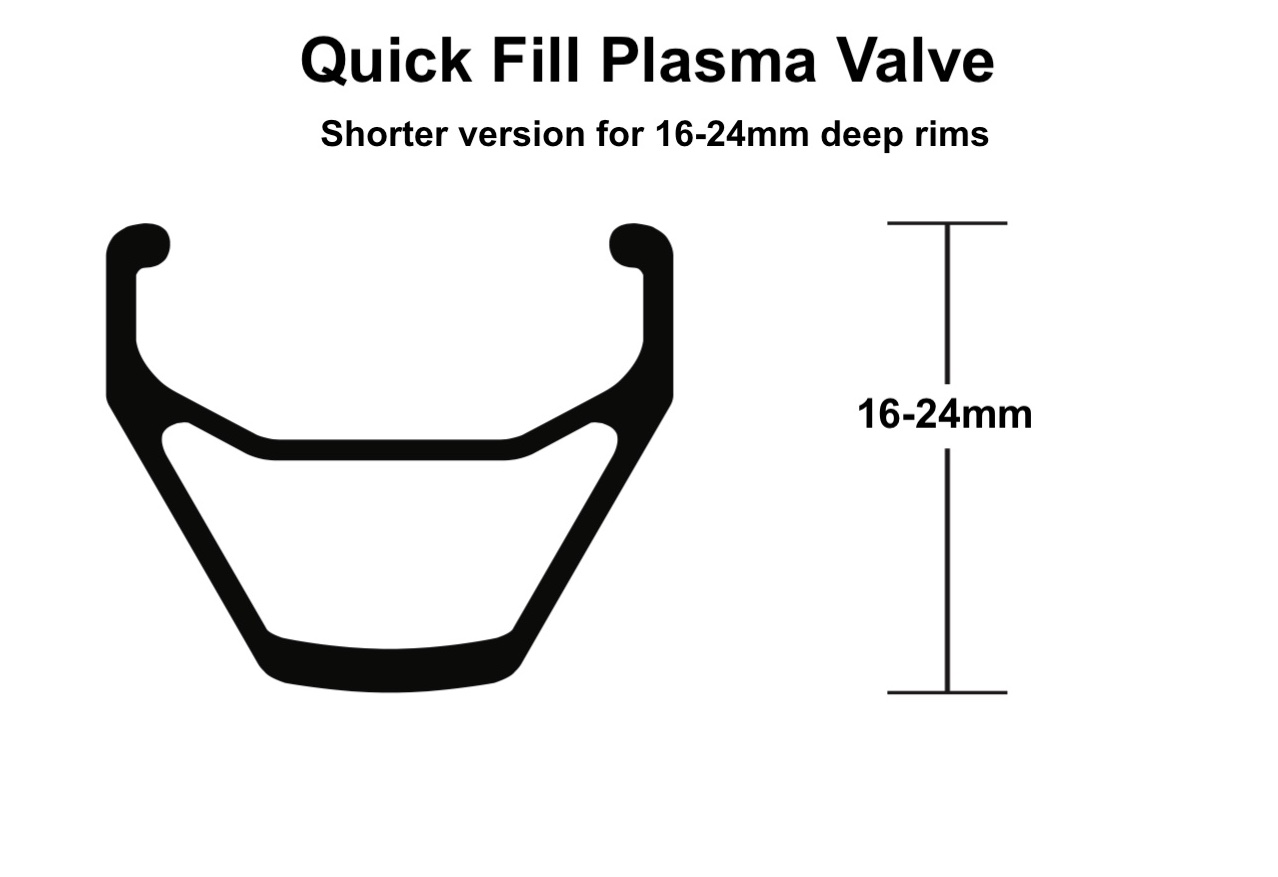
Our valves will fit a variety of rims including non-e*thirteen rims, however rim depth is an important factor in whether or not they will work for your rims. Compare your rim measurements to the measurements below to make sure they'll work for you.
______________________________________________________________________________
ANSWER: Yes, it did. In 2023, we removed the food grade dye being used to color the sealant. The old sealant was a seafoam blue/green and the sealant without the dye is white. The food grade dye also can fade over time. This has no impact on the functionality of the sealant.
People run wildly different pressures in their mountain bike tires, for all sorts of reasons. The best tire pressure for you depends on many factors that are personal to you - which is why there is no simple way for us say "this is the right pressure for you". Things such as tire selection, suspension setup, rider skill level, local terrain and many other factors can impact what pressure you should run on a given day.
The air in your tires has an important job, so your tire pressure should be checked before every ride since it is normal to lose air thru the tire casing, even overnight!
Here is a calculation which we recommend as a starting point:
Pbase = (your weight in lbs.) / 8
Front tire pressure in PSI= Pbase
Rear tire pressure in PSI = Pbase + 3
See Table below for calculated values!
For ebikes, considering the additional weight we recommend +3 PSI to above values
If you stopped reading now and you inflated your tires to those pressures, you'd be able to ride your bike, and the performance would probably be okay, and you'd be unlikely to dent or damage your rims.
Once you have that baseline pressure set in your mind, you can start experimenting with your pressure. The right pressure for you could be more or less than what you ended up with using the above equation. If you decide you want to let air out, you need to be acutely aware of what a rim impact feels like when riding. If your rim is contacting the ground through your tire (impact), your tire pressure is too low and you are risking a rim failure.
Things to consider as you start to experiment:
- We ALWAYS recommend using a digital pressure gauge. Don't rely on the potentially suspect analog gauge on your pump or "tire feel" by compressing the tire with your hands.
- Tire sidewall construction - heavier sidewall tires can generally run lower pressure
- Tire Volume - wider, larger diameter tires hold more air, which will develop a lower spring rate
- Tire Profile - tires with square tread profile may need a little more air to roll fast, while rounder tires may allow slightly lower pressure
- Tire inserts may help reduce the possibility of rim damage. Some inserts like Cushcore will also provide casing stability. When running inserts which provide casing stability, it is critical to not reduce pressure more than 2 PSI from your correct non-insert pressure. Even with inserts, you can still damage or crack a rim if your pressure is too low.
Keep in mind the role of air in your tires as you are experimenting:
- Absorb impacts like a spring and protect your rim
- Support the casing and stiffen the tire under side/turning loads
- Stiffen the carcass to reduce knob deflection under braking and turning
- Absorb and blunt vibrations before they reach you
- Maintain the tire cross-section to reduce rolling resistance while rolling, pedaling and braking
- Probably other things
Reference Table:
| Weight (lbs) | Weight (kg) | Front Pressure (psi) | Rear Pressure (psi) |
| Under 100 | Under 45 | 12.5 | 15.5 |
| 100-110 | 50-45 | 13.75 | 16.75 |
| 110-120 | 55-50 | 15 | 18 |
| 120-130 | 59-55 | 16.25 | 19.25 |
| 130-140 | 64-59 | 17.5 | 20.5 |
| 140-150 | 68-64 | 18.75 | 21.75 |
| 150-160 | 73-68 | 20 | 23 |
| 160-170 | 77-73 | 21.25 | 24.25 |
| 170-180 | 82-77 | 22.5 | 25.5 |
| 180-190 | 86-82 | 23.75 | 26.75 |
| 190-200 | 91-86 | 25 | 28 |
| 200-210 | 95-91 | 26.25 | 29.25 |
| 210-220 | 100-95 | 27.5 | 30.5 |
| 220-230 | 105-100 | 28.75 | 31.75 |
| 230-240 | 109-105 | 30 | 33 |
| 240-250 | 114-109 | 31.25 | 34.25 |
**For E-Bikes - consider the additional weight of the bike, and add 3 psi to be safe!**
*equation stolen <ahem>, adapted from ye olde Stan's Pressure Method
e*thirteen tires size markings refer to the measurement from the outer most knob edge on the left side of the tire to the outermost knob edge on the right side of the the tire. Some tires, like our Grappler will have slightly staggered side knobs; in these cases we take the measurement from the wider set of knobs.
This is a Grappler 2.5" tire:
Tire construction is a manual process and there can be some slight width variations from tire to tire. Additionally, it is normal for a tire to stretch a small amount over the course of the first few weeks after install.
Tire width measurements can also be impacted by the inner width of the rim they are installed on. Our standard casing MTB tires are measured using a 30mm inside width rim. Our Plus size tires are measured using a 35mm Inside width rim.
The maximum pressure can be found printed on the sidewall of the tire.
The max pressure can vary between tire models due to different casing construction and other factors.
Can I use CO2 with e*thirteen tires and/or Tire Plasma sealant?
Answer: Yes. Inflating your tire with a CO2 canister will not negatively impact your tire or notably change the life or function of our Tire Plasma sealant.
- If you pinch flat, you simply were not running enough air for that application/terrain. It really is that simple. Comparing PSI or PSI recommendations with other riders can often be a futile practice - different terrain, riding styles and regional variations in rock type and trail speed all have impacts on what tire pressure you personally should run. Just because Mr Shreddy McShredster weighs the same as you, running the same PSI wont necessarily be the correct for you. Ultimately an individual rider should know best....but if you are having frequent trouble pinching, you're not running a high enough pressure for the tire spec, speed and terrain you were riding.
- Tire pressure: Use a digital tire gauge before EVERY ride. You should be more diligent about checking tire pressure than even lubing your chain. Every. single. ride. Don't let air out mid-ride "for the descents" (it's long been proven that harder tire pressure is not as beneficial as it may seem for climbing/flats when MTB'ing). With some attention and diligence, you will get to a point where you can pick the correct pressure based on which of your local areas you are riding riding and how rocky/fast they are. Also, you can decide "I want to reduce pressure for a bit more cornering traction but pay the pinch price if I make a mistake riding and come down hard on a sharp rock" vs "Im running a pressure where I know I can ride the descents of rocky trails like a hack and not worry about pinch flats because I didnt bring my pump". We have a handy article here which outlines starting points for tire pressure.
- All Semi-Slick tires (not just e*thirteen) will be more susceptible to pinch flats when compared with a non-ss of identical construction. This is because tire knobs pad impacts when you have a situation where tire pressure is so low that an impact compresses the tire into the rim. You will need to run a slightly higher pressure with an semi-slick than with a non semi-slick.
Punctures
- This one is pretty simple - if you are experiencing frequent punctures, you need a heavier duty casing tire. Air pressure will not likely make a quantifiable difference here.
We generally recommend tape that is the same width or 1-2mm wider than the inside width measurement of the rim it is being installed on.
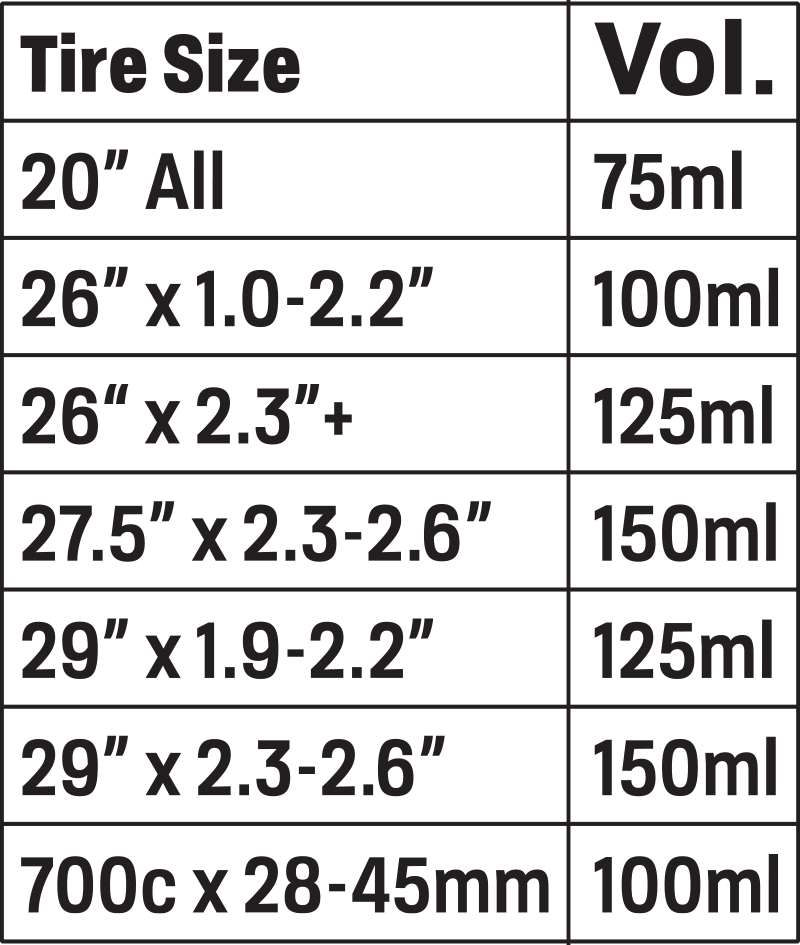
Refer to the following table for our minimum recommended volume of Tire Plasma Sealant:
Our current range of tires including the Grappler and All-Terrain models are designed to be used with rims having a 30mm inside width measurement. We generally consider them compatible with 27mm-35mm inside width measurements but sizes narrower or wider will result in a sub-optimal tread profile.
While we are partial to our own sealant, our tires are compatible with other tubeless sealants on the market such and Stans, Slime and Orange Seal.