FAQ
Standard (Non Covert ICR) Base, Plus or Race bars:
Answer: Yes, but make sure your cockpit controls fit to your preference first.
There is no structural reason why you should not trim your handlebars shorter than the recommended minimum of 760mm; however, make sure your cockpit controls fit to your preference before trimming. Depending on brake lever and shift type, the bend in the handlebar may limit control positioning and require brake levers or shifters positioned closer to the grip than ideal.
Covert ICR Bars
Answer: The trim marks on the ICR bars show a maximum of 30mm trimmed per side, resulting in a 740mm bar width. This is the minimum we recommend due to the cable routing channel grove locations.
You can read up on our product categories and levels here: XCX, TRS, and LG1? Base, Plus and Race? What does all that mean?
When it comes to our bars and stems, the same principals apply except that we don't currently make a Race level stem.
Handlebars
Base: 6061 alloy and 404g
Plus: 7050 alloy and 295g
Race: Carbon and 234g
Stem
Base: 6061 alloy and 160g (40mm) / 178g (50mm)
Plus: 7050 alloy and 145g (40mm) / 163g (50mm)
Answer: Handlebar sweep and roll are highly dependent on personal preference. There is not a "correct postion" or "incorrect position".
Also, bicycle head tube angle will impact the roll requirement to achieve a "neutral" bar position for a given bar. This means marks on the bar indicating specific roll/sweep positions assume a specific head tube angle for them to be true. With modern headtube angles on bikes varying 5 degrees or more, there can be some notable differences between bikes which is why we don't explicitly state these numbers on our handlebars.
Yes! Loosen the T25 bolt at the end of the pedal axle and using your fingers, rotate the SpinControl knob. This will adjust the bearing tension. Tighten it back up when you are done. Igus bearings will also break in after a bit of riding, so they will naturally loosen up after your first few rides.
You can also check out our video instructions below
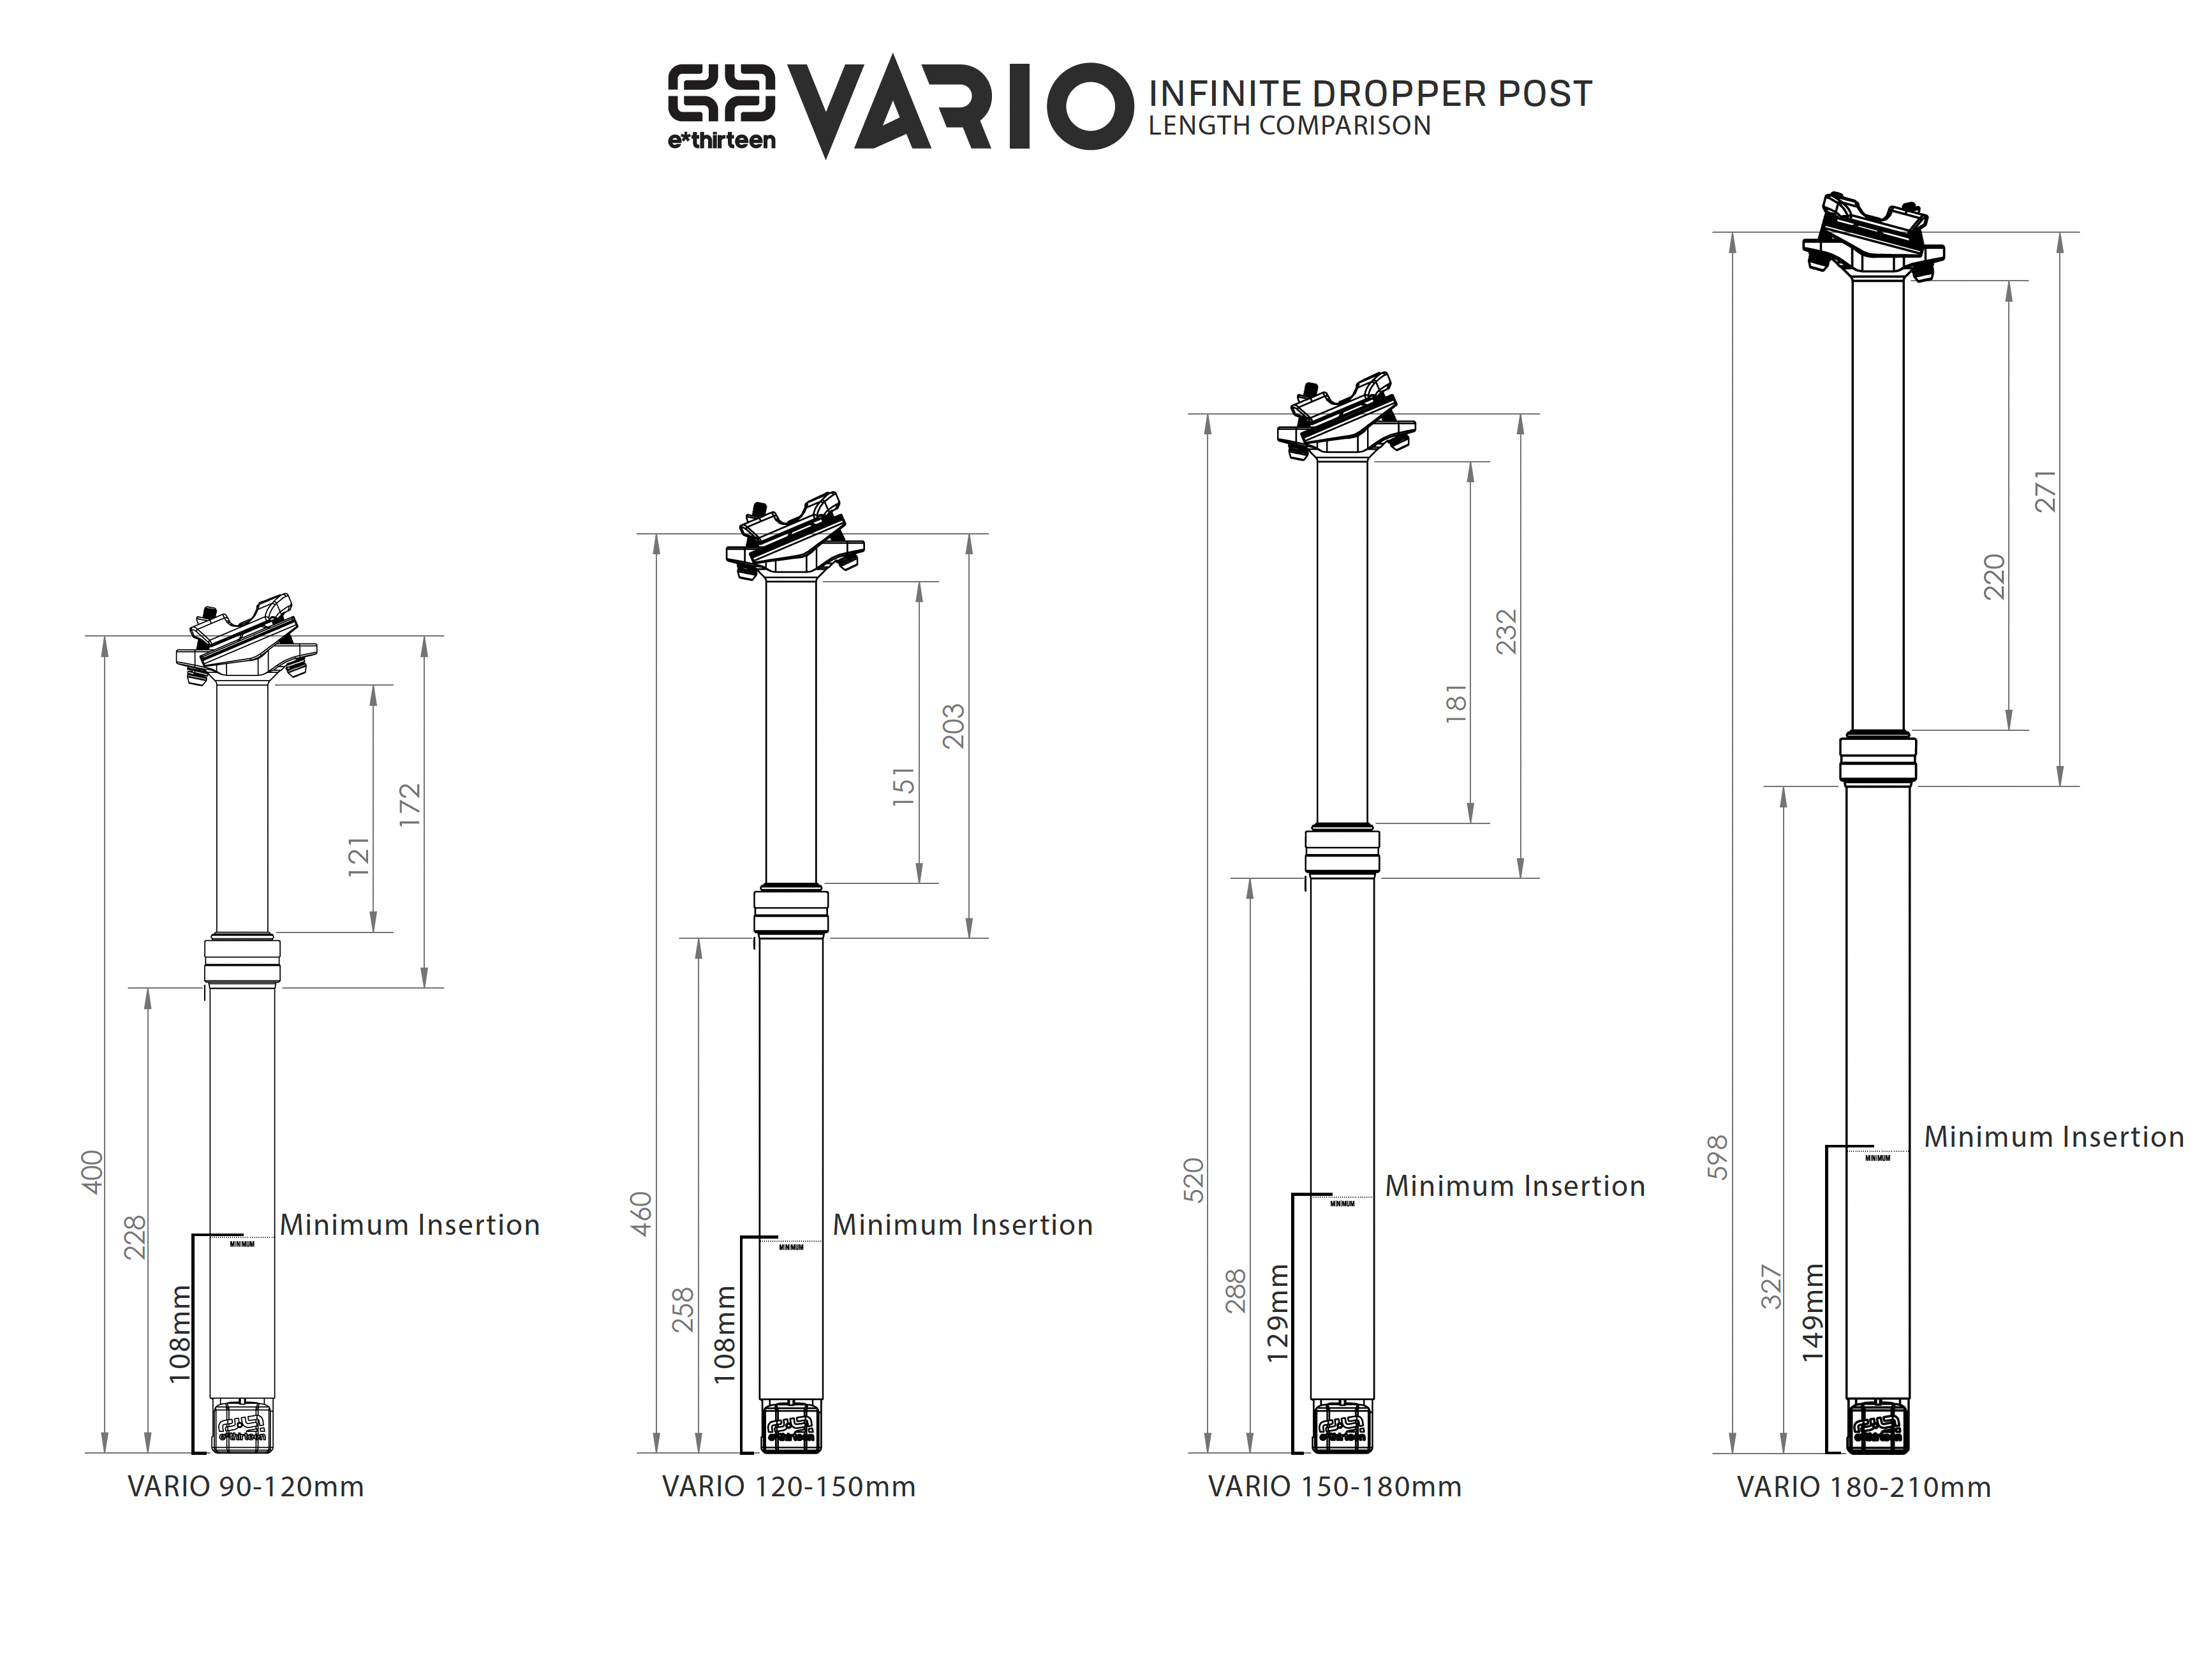
What are the two styles of height adjustment available for the Vario?
Two styles of Vario Infinite adjustment bushings have been produced, and are pictured here:
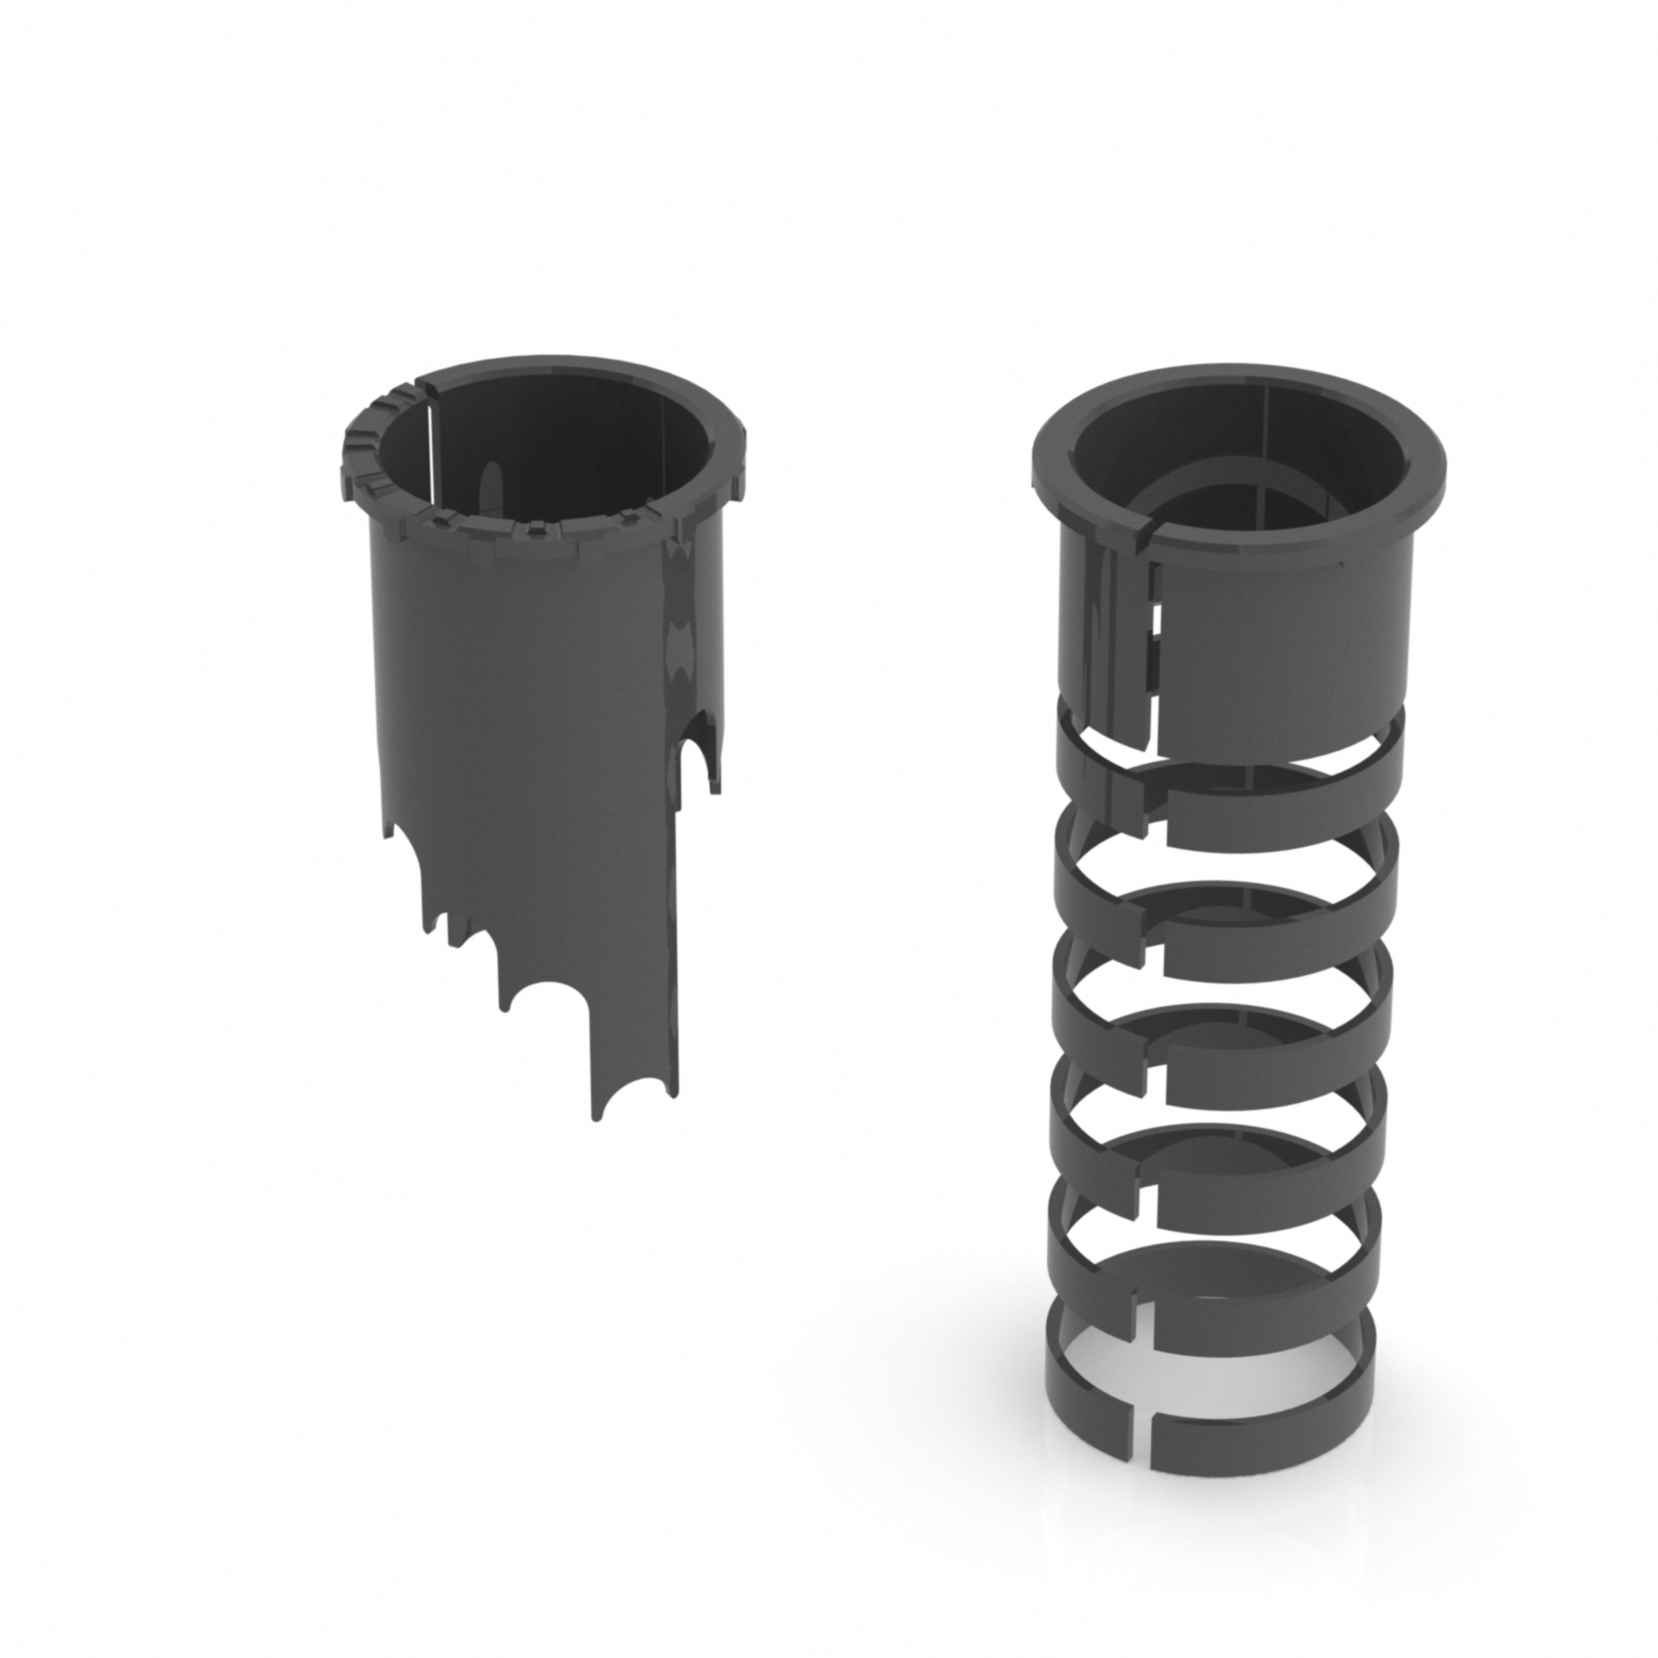
The original bushing pictured on the left allows height adjustment to be made by rotating the bushing such that the brass keys in the seatpost land on different "steps" to adjust the extended height of the seatpost. This bushing came in early production versions of the Vario and is available for purchase in the Vario Refresh Kit - SPS20-103
The new, current bushing pictured on the right allow the extended height of the seatpost to be adjusted by adding or subtracting 5mm rings below the main bushing. This is the bushing which comes delivered stock in seatposts produced in late 2021 to current.
Why did e*thirteen release a second adjustment method for the Vario seatpost?
While we always endeavor to develop and product novel products for our brand, sometimes another company beats you to the punch with a concept. In the case of our original Vario stepped bushing, we discovered after launching the product that another company had developed a nearly identical concept unbeknownst to us. As such, we have updated our design in consideration of their invention!
Well, we wanted to tweak things a bit, so we did:
- Less seal drag thanks to improved seals. Turns out we all like to ride flat pedals more often than just on the DH bike, so we are using some new seals that cut down on pedal drag when the Spin Control knob is backed off.
- Smaller diameter pins for better grip and a bit of weight savings. Be sure to order the appropriate replacement pins to match your pedals.
Gen1 pedals use a 5mm thread
Gen2 pedals use a 4mm thread
Answer: 1-2mm when new. Additional play over the course of use can vary.
Dropper seatposts rely on a small gap between the brass guide keys and keyway slot to move freely and stay properly lubricated when the post is actuated. Rotational or side-to-side play in the dropper stanchion (and seat) are a result of this gap. This gap is also important to allow contaminants (dirt and grime) to be purged (as opposed to binding and damaging) from the keyway. Dropper posts with a tighter key vs keyway fit and subsequently less rotational play often are more service intensive and problematic.
A new post will have 1-2mm when measured at the nose of the saddle and this is considered normal. Over the course of the first few rides, this play might increase incrementally as the system breaks in.
A multitude of factors can impact the speed at which the brass guide keys wear and play increases as the post gets used. Seat tube angle, riding conditions, rider weight, and how regularly the post is getting serviced will all impact the rate at which brass guide keys wear and stanchion rotational play increases.
Answer: No
As of today we only make the Vario dropper post with internal routing. We currently do not have plans to offer an externally routed version.